


%20--%3e%3csvg%20version='1.1'%20id='Layer_1'%20xmlns='http://www.w3.org/2000/svg'%20xmlns:xlink='http://www.w3.org/1999/xlink'%20x='0px'%20y='0px'%20viewBox='0%200%20178.6%2028.4'%20style='enable-background:new%200%200%20178.6%2028.4;'%20xml:space='preserve'%3e%3cstyle%20type='text/css'%3e%20.st0{fill:%2380A2FF;}%20%3c/style%3e%3ctitle%3eHome_Testimonial_Asset_SVG%3c/title%3e%3cg%20id='Content'%3e%3cpath%20class='st0'%20d='M24.2,28.4L15,21.7l-9.3,6.7l3.5-10.9L0,10.9h11.4L15,0l3.5,10.9h11.4l-9.3,6.7L24.2,28.4z'/%3e%3cpath%20class='st0'%20d='M61.4,28.4l-9.3-6.7l-9.3,6.7l3.5-10.9l-9.2-6.7h11.4L52.1,0l3.5,10.9h11.4l-9.3,6.7L61.4,28.4z'/%3e%3cpath%20class='st0'%20d='M98.6,28.4l-9.3-6.7l-9.3,6.7l3.5-10.9l-9.2-6.7h11.4L89.3,0l3.5,10.9h11.4L95,17.6L98.6,28.4z'/%3e%3cpath%20class='st0'%20d='M135.7,28.4l-9.3-6.7l-9.3,6.7l3.5-10.9l-9.2-6.7H123L126.5,0l3.5,10.9h11.4l-9.3,6.7L135.7,28.4z'/%3e%3cpath%20class='st0'%20d='M172.9,28.4l-9.3-6.7l-9.3,6.7l3.5-10.9l-9.2-6.7h11.4L163.6,0l3.5,10.9h11.4l-9.3,6.7L172.9,28.4z'/%3e%3c/g%3e%3c/svg%3e)
'/%3e%3crect%20x='5.833'%20y='24.019'%20width='20.456'%20height='1.469'%20rx='0.734'%20fill='%239751d9'/%3e%3c/g%3e%3c/svg%3e)
 Upgrade Anytime
 Cancel Anytime
'/%3e%3c/svg%3e)
'/%3e%3c/svg%3e)
'/%3e%3c/svg%3e)
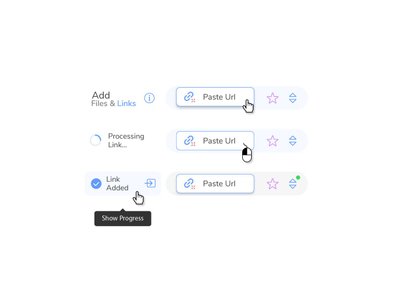
 Transfer To Our Cloud Storage
 Stream and Download To Your Device
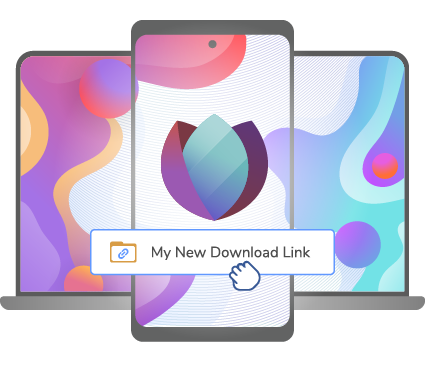
Seedr PWA Announcement: A New Way to Access Your Files
Tired of slow browser-based file access? We're excited to introduce the Seedr PWA (Progressive Web App), designed to make your experience faster, smoother, and more app-like — without the need for app store downloads. Whether you're on mobile or desktop, the PWA brings the best of Seedr to your fingertips.